EasyTricks - For Life

    Social Items


In this post, i am going to share with you custom stats blogger widget. By using this widget you can display total page views, total posts and total comments of your blog. Only blogger has total page views widget. After that time, i modify some css and added some script for total posts and total comments. The design of this widget is modern and clean. I used some icons using font awesome. Installing custom stats widget is very useful.

It is very unique and smart design. Some of friends requested me to share this blogger widgets. After that time now i am share this with new look and one more extra features. This blogger widgets help you to display Total page views, comments and total posts of your blog. People who want make their blog more attractive and beautiful, some blogger widgets make them easy. 

View Result

How to install custom stats blogger widget

Here is some very simple steps to installing custom stats blogger widget. In this blogger widget i used font awesome icons and PT Sans google font. So you have also need to adding These fonts on your blog. If font awesome already added on your blog. then ignore it.

Step 1: Go to Layout > Add a Gadget > Blog's Stats add this widget.

Install Custom Stats Widget for Blogger

Step 2: Now go to Edit HTML and find below codes.

<b:widget id='Stats1' locked='false' title='Custom Stats' type='Stats' version='1' visible='true'>...</b:widget>

Now replace this line with below codes.


<b:widget id='Stats1' locked='false' title='Custom Stats' type='Stats' version='1' visible='true'>
    <b:includable id='main'>
  <b:if cond='data:title'><h2><data:title/></h2></b:if>
  <div class='widget-content'>
    <!-- Content is going to be visible when data will be fetched from server. -->
    <div expr:id='data:widget.instanceId + &quot;_content&quot;' style='display: none;'>
      <!-- Counter and image will be injected later via AJAX call. -->
      <b:if cond='data:showSparkline'>
        <img alt='Sparkline' expr:id='data:widget.instanceId + &quot;_sparkline&quot;' height='30' src='http://2.bp.blogspot.com/-nsxCtkYnchQ/VLEifAyf97I/AAAAAAAAIlk/9Viyy0W9r04/s1600/FFF.png' title='Sparkline' width='75'/>
      </b:if>
      <b:if cond='data:showGraphicalCounter'>
        <span class='counter-wrapper graph-counter-wrapper' expr:id='data:widget.instanceId + &quot;_totalCount&quot;'/>
      <b:else/>
        <span class='counter-wrapper text-counter-wrapper' expr:id='data:widget.instanceId + &quot;_totalCount&quot;'/>
      </b:if>
<script type='text/javascript'>
function postCount(json){
document.write(&quot;<span class='counts post2'> Total Posts &quot;);
var count = json.feed.openSearch$totalResults.$t;
document.write(&quot;<span class='count'>&quot; + count + &quot;</span>&quot;);
document.write(&quot;</span>&quot;)
}

function numberOfComments(json){
document.write(&quot;<span class='counts comment'> Total Comments &quot;);
var count = json.feed.openSearch$totalResults.$t;
document.write(&quot;<span class='count'>&quot; + count + &quot;</span>&quot;);
document.write(&quot;</span>&quot;)
}

</script>
<script src='/feeds/posts/default?alt=json-in-script&amp;amp;max-results=0&amp;amp;callback=postCount' type='text/javascript'/>
<script src='/feeds/comments/default?alt=json-in-script&amp;amp;max-results=0&amp;amp;callback=numberOfComments'/>


    </div>
  </div>
</b:includable>
  </b:widget>

You're 80% done. Now paste all below CSS Codes befor </head>

<link href='//fonts.googleapis.com/css?family=PT+Sans:400,700' rel='stylesheet' type='text/css'/>
<link href='//maxcdn.bootstrapcdn.com/font-awesome/4.5.0/css/font-awesome.min.css' rel='stylesheet'/> 
<style type='text/css'>
/* Blogger Custom Stats widget by msdesignbd.com */
.Stats img {display:none!important;background-image:none;}
.Stats .counter-wrapper {width:92%;text-align:right;margin:10px;line-height:35px;color:#333;font-weight:700;font-size:16px;margin-left: 0;}
.Stats .counter-wrapper:after {content:&quot;Page Views&quot;;float:left;text-align:left;font-size:13px;font-weight:700;color:#333;}
.counts {display:inline-block;width:92%;font-size:13px;line-height:35px;color:#333;font-weight:700;}
.counts .count {display:inline-block;font-size:16px;height:30px;
vertical-align:top;direction:ltr;float:right;color:#333;font-weight:700!important;}
.counts:hover .titles:before {color:#333!important;border-radius:2px;border-color:rgba(255,255,255,0.1);}
.counter-wrapper.text-counter-wrapper:before, .counts:before {display:inline-block;font-size:13px;font-family:FontAwesome;font-style:normal;font-weight:normal;margin:0 10px 0 10px;float:left;width:10px;text-align:center;}
.counter-wrapper.text-counter-wrapper:before, .counts:before {
display:block;background-color:#fff;color:#333;width:35px;height:35px;font-size:18px;line-height:35px;border-radius:2px;margin:0px 8px 0 0;}
.counter-wrapper.text-counter-wrapper:before {content:&quot;\f06e&quot;;}
.counts.post2:before {content:&quot;\f044&quot;;}
.counts.comment:before {content:&quot;\f0e6&quot;;}
#Stats1_content {width:auto;height:auto;background-color:#fff;}
</style>

You're done. Now Save template and see result by refreshing page.

Hope you understand that, how to add custom stats blogger widgets on blog or blogger site. If you have any problem, then feel free to communicate by comment box. If you like this widget, then don't forget to share this post with your social media. Your support is our future. Thanks.  
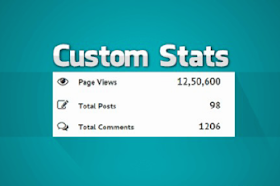
Install Custom Stats Widget for Blogger

Install Custom Stats Widget for Blogger

Hello Guys! Today I Am Sharing A Very Important Article.

Now A Days People Stealing Articles From Site By Coping & Today I Am Here To stop Them. So If You Want To Stop Copying Articles From Your Site Follow My Article.


We Are Doing It With JS. So All You Have To Do Is Go To Blogger & Add This Code Before </body> Of Your Blog. That's All.


<script>
function thang_cuong_matlon() { var ditmecuong = document.getElementsByTagName('body')[0]; var cuongnunglon; cuongnunglon = window.getSelection(); var cuonglon = "Stop Stealing Others Content. Don't You Have Your Brain!"; var copdiditmecuong = cuonglon; var thangmatloncuongcopdi = document.createElement('div'); thangmatloncuongcopdi.style.position='absolute'; thangmatloncuongcopdi.style.left='-99999px'; ditmecuong.appendChild(thangmatloncuongcopdi); thangmatloncuongcopdi.innerHTML = copdiditmecuong; cuongnunglon.selectAllChildren(thangmatloncuongcopdi); window.setTimeout(function() { body_element.removeChild(thangmatloncuongcopdi); },0);} document.oncopy = thang_cuong_matlon;
</script>

So Now Your Sites Content Is Free From Stealing.

Thanks To Niguen Dien.

How To Stop Copying Your Article

How To Stop Copying Your Article

Hello! Welcome To EasyTrks. Today I Will Show You How To Make A Partner Widget On Blogger Or Wapkiz.


First Go To Blogger & Add This Css Code Before </style>

For Wapkiz Go To Panel Mode > Css Theme > Scroll Down > Add New With Editor & Add This Code. 

/* Partner Widget */
.my-partner-wd {text-align: center;}
.my-partner-wd img {margin:0px 5px 5px 0px;padding:5px;text-align:center;border:1px solid #ddd;}
.my-partner-wd img:hover {border:1px solid #aaa}
.my-partner-wd img.noborder {border:0;}

After Adding The Css Code You Just Need To Add The Html Where You Wanna Install The Partner Widget.


<div class="my-partner-wd">
<a href="PARTNER-URL" title="PARTNER-TITLE"><img class="noborder" src="PARTNER-IMG-URL" alt="PARTNER-IMG-ALT" width="125" height="125" /></a>
<a href="PARTNER-URL" title="PARTNER-TITLE"><img class="noborder" src="PARTNER-IMG-URL" alt="PARTNER-IMG-ALT" width="125" height="125" /></a> 
</div>

Edit
PARTNER-URL : Partner Blog/Website Url
PARTNER-TITLE : Partner web/blog Title
PARTNER-IMG-URL : Partner Img Banner
IMAGE SIZE : Partner Img Size (As you)

Then save your widget.

I don't think it's difficult to create an ad box on a blog, just need to add some code to the blog template. For that I just end the tutorial on How to make a partner widget on blogger. May be useful.

How To Add Partner Widget On Blogger Or Wapkiz

How To Add Partner Widget On Blogger Or Wapkiz


Hello Guys Welcome To EasyTrks. Today I Will Show You How To Make A Navigation Bar Using Bootstrap 4. So Stay Tuned.

Introduction : Bootstrap Probably The Best Way Of Making Navigation Bar For New Bees. Bootstrap Is A Program That Have Huge Css Inside It. It's Known World Wide & Beings Used By Many Sites. But The Most Important Thing Is It's Absolutely Free To Use.

We Will Use Pooper Js & Jquery To.


So Let's Get Started .

> Go To Your Site & Add This Bootstrap In The Middle Of <head> & </head> Section.


<link rel="stylesheet" href="https://maxcdn.bootstrapcdn.com/bootstrap/4.0.0/css/bootstrap.min.css" integrity="sha384-Gn5384xqQ1aoWXA+058RXPxPg6fy4IWvTNh0E263XmFcJlSAwiGgFAW/dAiS6JXm" crossorigin="anonymous">

> This Was The css & Now Let's Add The Jquery & Popper Js.


<script src="https://code.jquery.com/jquery-3.2.1.slim.min.js" integrity="sha384-KJ3o2DKtIkvYIK3UENzmM7KCkRr/rE9/Qpg6aAZGJwFDMVNA/GpGFF93hXpG5KkN" crossorigin="anonymous"></script>
<script src="https://cdnjs.cloudflare.com/ajax/libs/popper.js/1.12.9/umd/popper.min.js" integrity="sha384-ApNbgh9B+Y1QKtv3Rn7W3mgPxhU9K/ScQsAP7hUibX39j7fakFPskvXusvfa0b4Q" crossorigin="anonymous"></script>
<script src="https://maxcdn.bootstrapcdn.com/bootstrap/4.0.0/js/bootstrap.min.js" integrity="sha384-JZR6Spejh4U02d8jOt6vLEHfe/JQGiRRSQQxSfFWpi1MquVdAyjUar5+76PVCmYl" crossorigin="anonymous"></script>

For Wapkiz Go To Panel Mode > Meta Header & Add All Of This Codes.
After Installing All Of This Code You Are Ready For Installing Navigation Bar. Just Add This Html Code  Where You Want To Install Navigation Bar.


<nav class="navbar navbar-expand-lg navbar-light bg-light">
  <a class="navbar-brand" href="#">Navbar</a>
  <button class="navbar-toggler" type="button" data-toggle="collapse" data-target="#navbarSupportedContent" aria-controls="navbarSupportedContent" aria-expanded="false" aria-label="Toggle navigation">
    <span class="navbar-toggler-icon"></span>
  </button>

  <div class="collapse navbar-collapse" id="navbarSupportedContent">
    <ul class="navbar-nav mr-auto">
      <li class="nav-item active">
        <a class="nav-link" href="#">Home <span class="sr-only">(current)</span></a>
      </li>
      <li class="nav-item">
        <a class="nav-link" href="#">Link</a>
      </li>
      <li class="nav-item dropdown">
        <a class="nav-link dropdown-toggle" href="#" id="navbarDropdown" role="button" data-toggle="dropdown" aria-haspopup="true" aria-expanded="false">
          Dropdown
        </a>
        <div class="dropdown-menu" aria-labelledby="navbarDropdown">
          <a class="dropdown-item" href="#">Action</a>
          <a class="dropdown-item" href="#">Another action</a>
          <div class="dropdown-divider"></div>
          <a class="dropdown-item" href="#">Something else here</a>
        </div>
      </li>
      <li class="nav-item">
        <a class="nav-link disabled" href="#">Disabled</a>
      </li>
    </ul>
    <form class="form-inline my-2 my-lg-0">
      <input class="form-control mr-sm-2" type="search" placeholder="Search" aria-label="Search">
      <button class="btn btn-outline-success my-2 my-sm-0" type="submit">Search</button>
    </form>
  </div>
</nav>

And Now Your Done.
Wanna See Demo!


Special Thanks To GetBootstrap.Com
How To Make A Bootstrap 4 Navigation Bar

How To Make A Bootstrap 4 Navigation Bar


Livia Luna is a responsive Blogger Template from Namina. It's very charming & full of features. So if you wanna try this you can easily use it by downloading from here.

Features : It's a grid based blogger template which makes it charming & pretty attractive & it's very fast.

It's designed with pure css which makes it lite. It's have Features Slider with quit awesome look.

Enough Of Talking Let's Have Look At Features Of This Template. 


Features Availability
Responsive True Check
Mobile Friendly True Check
SEO Friendly True
Personal Blog True
2 Column True
Light Base Sky Blue Color True
Related Posts with Thumb True
Search Box True
Subscription Box True
Social Share Button True
Back to Top Button True
Grid Style True
Page Numbered True
Recent Post Slider True
Menu Navigation True
Notification Box True

Now Let's Have The Demo & Download Link.


Pro Version Brought  To You By BtemplatesBD.
Livia Luna Responsive Blogger Template Premium

Livia Luna Responsive Blogger Template Premium


Hello Friends Welcome To EasyTrks Today I will show you how to make a Slide Up & Down Button For Blogger.
So Follow The Tutorial. 

How To Make Slide Up & Down Button

First Make Sure Font Awesome Is Installed On Your Site. If Not First Install Font Awesome Icons On Your Site. If Not

Ad This Font Awesome Css Code Before </head>

<script type='text/javascript'>
//<![CDATA[
//CSS Ready
function loadCSS(e, t, n) { "use strict"; var i = window.document.createElement("link"); var o = t || window.document.getElementsByTagName("script")[0]; i.rel = "stylesheet"; i.href = e; i.media = "only x"; o.parentNode.insertBefore(i, o); setTimeout(function () { i.media = n || "all" }) }
loadCSS("https://maxcdn.bootstrapcdn.com/font-awesome/4.7.0/css/font-awesome.min.css");
//]]>
</script>

After Installing The Font Awesome Icons Go To Blogger > Theme > Edit Html & Add This css Code Before </head>


Color Option 1

<style type='text/css'>
/* Slide Up and Down */
#slidetop,#slidebottom{background:#fff;margin:0;padding:5px 15px 0;border-radius:0;position:fixed;color:#222;bottom:0;border:1px solid rgba(0,0,0,0.05);border-bottom:0;cursor:pointer;display:none;line-height:2;box-shadow:0 -1px 20px rgba(0,0,0,0.05);backface-visibility:hidden;-webkit-transform:translateZ(0);transform:translateZ(0);transition:all .3s}#slidetop:hover,#slidebottom:hover{background:#fafafa}#slidetop{right:46px;border-radius:5px 0 0 0}#slidebottom{right:0;border-right:0;box-shadow:5px -1px 20px rgba(0,0,0,0.05)}
@media only screen and (max-width:768px){#slidetop{right:43px}}
</style>

Color Option 2

<style type='text/css'>
/* Slide Up and Down */
#slidetop,#slidebottom{background:#e74c3c;margin:0;padding:5px 15px 0;border-radius:0;position:fixed;color:#fff;bottom:0;cursor:pointer;display:none;line-height:2;backface-visibility:hidden;-webkit-transform:translateZ(0);transform:translateZ(0);transition:all .3s}#slidetop:hover,#slidebottom:hover{background:#333}#slidetop{right:46px;border-radius:5px 0 0 0}#slidebottom{background:#c0392b;right:0}
@media only screen and (max-width:768px){#slidetop{right:43px}}
</style>

Now Add This Code Before  </body>

<div id='downfooter'/>
<a href='#' id='slidetop'><i class='fa fa-chevron-up' title='Slide up'/></a><a href='#' id='slidebottom'><i class='fa fa-chevron-down' title='Slide down'/></a>
<script type='text/javascript'>
//<![CDATA[
// Slide Up and Down by www.easytrks.blogspot.com
!function(o){o(window).scroll(function(){o(this).scrollTop()>75?(o("#slidetop").removeAttr("href"),o("#slidetop").fadeIn()):o("#slidetop").fadeOut()}),o(function(){o("#slidetop").click(function(){return o("html, body").animate({scrollTop:0},"slow"),!1})})}(jQuery),function(o){o(window).scroll(function(){o(this).scrollTop()<0?(o("#slidebottom").removeAttr("href"),o("#slidebottom").fadeOut()):o("#slidebottom").fadeIn()}),o(function(){o("#slidebottom").click(function(){return o("html, body").animate({scrollTop:$("#downfooter").offset().top},"slow"),!1})})}(jQuery);
//]]>
</script>

Now Save The Template.


See The Result


Color Option 1


Color Option 2


This Template Is Brought To You By Easytrks.
How To Make Go Up & Down Button On Blogger

How To Make Go Up & Down Button On Blogger

Subscribe To Our Newsletter